
When I first began preparing a new habitat for my axolotl, I realized how important it was to follow the right process. It’s not just about filling a tank with water — the whole setup needs planning to make sure your pet stays happy, healthy, and safe. You’ll want to start by doing some research beforehand, so you know what your axolotl really needs. Choosing the correct axolotl tank size can make a big difference.
A larger aquarium helps reduce harmful residues and supports a more stable environment. I learned this the hard way after bringing mine home today, realizing the cost of upgrading later was higher than doing it right the first time. It’s also great to have all your supplies prepared — like a clean towel, paper for drying your hands, and warm water to rinse (with no soap). This prevents anything potentially damaging from getting into the water.
Some people ask about Axolotl tank mates, and while it’s a fun idea, it’s not always the best one. From my own experience, axolotls are different from most aquatic animals — they prefer being alone. Trying to mix them with fish or other pets can lead to stress or even demise. They’re not your average pet, and while they seem calm, the wrong tankmate can harm their health. That’s why understanding their needs is key — and every detail, from the setup to who they share space with, plays a part in how well they are cared for.
Here are some items from the list that are very necessary.
| ITEMS | |
| Axolotl | Always get a healthy, active axolotl from a trusted source, because weak ones may not survive the stress of a new tank. |
| Stand | Use a strong, water-resistant stand made for aquariums — I once used a regular table, and it started to sag after a few weeks. |
| Lid | A tight and secure lid is important because axolotls can jump, and an open tank also collects dust and bugs. |
| Light | Choose a dim, adjustable light since axolotls don’t like brightness — I use a low-intensity LED that keeps them calm. |
| Cooling fan | A small aquarium fan is a lifesaver in summer; it keeps the water cool without the need for a chiller. |
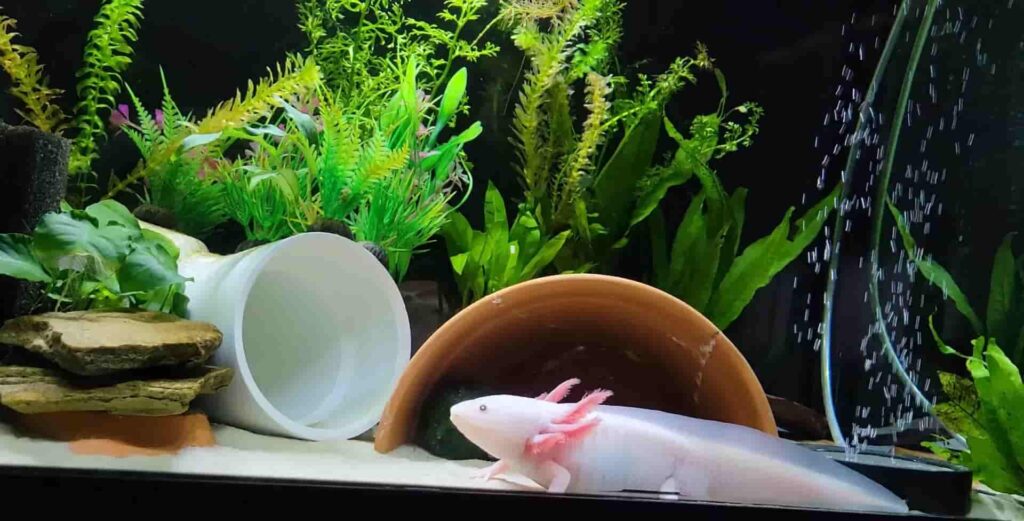
| Decorative log | Add a smooth, hollow log or hide because axolotls love resting in dark spots — mine spends hours chilling inside. |
| Thermometer | A reliable thermometer helps you monitor the tank temperature — I check it daily to avoid sudden changes. |
| 5-gallon bucket | Use a separate, clean bucket only for tank water changes — it keeps harmful soap or chemicals away. |
| Filter | Go for a low-flow or sponge filter so the water stays clean without creating a strong current that stresses the axolotl. |
| Substrate | Fine sand is best because it’s safe if swallowed — I once used gravel and my axolotl nearly choked on it. |
| Snails | A few peaceful snails help clean algae and bring some life to the tank, but avoid fast-breeding types. |
| aquarium thermometer | I prefer a digital stick-on thermometer — it’s easy to read and helps me keep the water at just the right temperature. |
| Fritz Complete | Use a water conditioner like Fritz Complete that removes chlorine, chloramine, and ammonia instantly — I always add it during water changes to keep my axolotl safe. |
| FritzZyme TurboStart 700 | This live bacteria starter helps cycle a new tank quickly — I’ve used it to establish healthy water fast, and it really cut down the waiting time. |

Axolotl Tank Setup – The Short Answer
Setting Up The Tank
When I started buying equipment for my Axolotls, the first step I learned was to clean every used tank and its materials with hot water. This is especially important if it came from a store or was resold, as there could be remaining bacteria from shipping or past failures with other aquariums. These can be harmful to your amphibian friends and potentially make them sick. Always rinse every item, no matter the number, to keep the water safe.
Before bringing home my first axolotl, I made sure to build a solid stand and place the aquarium on top. I then used a paper towel to thoroughly wipe the inside and remove all dust and debris—never use clorox wipes or chemical-based cleaners, as they can harm your axolotl. I began to fill the tank with cold tap water, using a 5-gallon bucket which made the process really easy.
Once filled, I followed the directions on the bottle to dose Fritz Complete, and added FritzZyme 700 Turbo Start for cycling. I took the thermometer from its packaging and placed it on the glass, making sure the abrasive side of the Mag-Float faced inside, and the soft one stayed outside for cleaning.
Next, I opened the box with the lid, which had an additional piece of plastic. To make the cooling fan fit, I used a razor blade, though scissors or a knife would also work.. After cutting, I moved on to the light, making sure to install it by following the included instructions. To complete the environment, I added a decorative log anywhere the axolotl could climb in and out easily, giving it comfort and security in its new space.
Getting the Filter Running Smoothly
When I first set up my axolotl tank, I made sure to unbox all parts carefully—starting with the sponge filter, tubing, and pump. To get things going, I connected the tubing to the pump, making sure everything was tightly attached. I had to cut the tubing about an inch from the end to add a valve, and I double-checked that the arrow on the valve was pointing in the right direction—away from the pump. It’s important to check this so the air flows properly and the system works as it should.
Next, I gently submerged the sponge filter into the water. It started to float, but a little squeeze helped it sink to the bottom. Then I plugged in the pump, and I was happy to see bubbles rising from the top of the filter. This told me the setup was operating well. From my experience, using this method is one of the easiest ways to ensure a smooth and reliable filtration process. If you want to read how to clean your aquarium filter click and read the full article.
Cooling the Tank the Right Way
To keep axolotls healthy, you require a setup that ensures cold water is available at all times. The temperature should be consistently kept between 15-20˚C or 60-68˚F, which is ideal for their comfort. I always recommend checking the water conditions before purchasing your axolotl. There are different ways to keep the tank cool—using clip-on fans, an AC unit, or even a chiller, depending on your room’s environment. Based on my experience, having the right information on how to cool the tank helps prevent problems early on.
When setting up the fan, first Remove the cooling fan from the box and follow the given instructions carefully. I usually Place it on any side of the aquarium where airflow is not blocked. Sometimes you may need to cut a small plastic portion of the lid or side wall for a better fit. In this case, it helps to refer to the “Setting Up The Tank” guide, which gives a step-by-step explanation. Making sure the fan is positioned well ensures steady airflow and helps keep the tank at the perfect temperature.
Acclimating Your Axolotl
When I first brought my axolotl home, I made sure to follow a slow and calm method to help it adjust to its new aquarium. I opened the bag from the top and began to evenly roll the sides downwards to keep it steady. To help the axolotl adjust to the new tank water, I used a half-shot glass to add a bit of water once every 5 minutes for a full 45 minutes. This slow mix is important, and there’s a helpful YouTube video that demonstrates exactly how to prepare the bag the right way.
After the wait, I carefully removed the bag and poured the old water out into a 5-gallon bucket or sometimes a clean tupperware container. I always leave just enough water so the axolotl is barely submerged. Then, I gently released it into the tank. That moment always feels special—watching it swim into its new home calmly.
Cycling Your Aquarium
A strong cycling guide starts with a good ammonia source to begin the nitrogen cycle. I prefer using Dr. Tim’s Ammonium Chloride because it’s the easiest and comes with set dosage instructions—though keep in mind, the label has an incorrect guide. The correct dosage is 1 drop per gallon to reach 1 ppm of ammonia. If that’s not available, unscented cleaning ammonia, liquid, or powder can also be used.
This process helps prepare your aquarium to be safe for your pet. The cycle is a lengthy process, taking weeks or even months. You can speed up the cycle using bottled bacteria—some brands like Fritz Turbo Start 700 work better if refrigerated and live. Don’t fall for pet stores’ claims that bacteria in a bottle can instantly cycle a tank without ammonia—these are simply false.
Throughout the process, test your water every 48 hours using a Liquid Test Kit. The API Freshwater Master Test Kit is the most recommended kit because it’s easy to read, comes with all reagents, and checks key water parameters like nitrite, nitrate, pH, and other necessary compounds. Avoid test strips, as they are inaccurate and often difficult to read. If your pH is too high or low, use the API GH & KH Test Kit to adjust it properly.
Once your cycled tank reaches 0 ppm of ammonia and nitrite, keep your nitrates between 10-20 ppm by doing weekly water changes. I always use a 5-gallon bucket, aquarium siphon, and squeeze the bulb to start siphoning. Use the wide-end in the tank and the narrow end in the bucket, then drain, discard, and fill it back with cold tap water from a hose, sink, or bathtub. Don’t forget to condition your new tap water with Fritz Complete, adding roughly 1/5th cap per 5 gallons.
Make sure the temperature is the same, then gently pour it back quickly and confirm levels to determine if values have gone down. Repeat this step as needed to keep your tank cleaner, reduce waste, and support live plants to help reduce nitrates.
Feeding Your Axolotl
When it comes to feeding your axolotl, one key thing I’ve learned is to always check the size of the worm before offering it. After taking it out of the container, I always rinse it to remove any excess dirt. Depending on your axolotl’s head width, the rule of thumb is to cut the worm into small pieces. I use the tongs from my tank kit to pick up the worm pieces and gently offer them by waving each bit immediately in front of their face. If they start to eat right away, you’re on the right track. Only feed as much as they’ll take—once your axolotl stops accepting the food, it means they are full.
What many don’t realize is how dangerous uneaten food in the aquarium can be—it may cause a sudden ammonia spike, which is harmful. For a healthy feeding plan, I make sure to feed juvenile axolotls daily, subadults once every 1-2 days, and adults every 1-3 days, always ensuring they are consuming what’s given without leftovers. This routine helps maintain water quality and keeps my axolotls happy and active.
Diet and Enrichment (Balanced Nutrition and Comfort Zones)
When planning your axolotl tank setup, it’s not just about space and water quality—diet and enrichment play a big role in keeping your pet happy and healthy. Most owners prefer raising their own worm farm to ensure a steady supply of fresh food. It’s quite beneficial to have bulk worms at home, even if they only need to restock every few months.
Species like European nightcrawlers (Eisenia hortensis), Canadian nightcrawlers (Lumbricus terrestris), and red wigglers (Eisenia fetida) are great choices. If breeding them seems hard, I often recommend ordering from Uncle Jim’s Worm Farm, which offers worms in bulk and ready to feed. These worms become the main diet, often supplemented with axolotl pellets for added variety.
The pellets used should be rich in protein—at least 45%—to meet your axolotl’s needs. I personally find three types highly recommended: Rangen Salmon Pellets, Hikari Sinking Carnivore Pellets, and Invert Aquatics Pellets. These supplement the live food and make sure the axolotls receive a balanced mix of nutrients. Adding occasional treats can make feeding time more engaging for them, while also encouraging natural hunting instincts.
Creating safe and relaxing zones in the tank helps axolotls deal with light, since they have no eyelids and are quite sensitive. It’s smart to place around 1-2 cavelike hiding areas where they can escape the brightness. The appropriate hide should have no small openings to avoid the risk of them getting stuck.
Some great examples I’ve used are the Shale Ledge Cave, Extra Large Shale Ledge Cave, Marina Polyresin Cave Hide, Ancient Vase Hide, Artificial Driftwood Decoration, and Rock Cave Hide. You can also enhance the tank with plants that thrive in cold water and low light, like Anubias and java fern, which grow well even with no substrate.
Place Your Axolotls Hideouts in the Tank
When setting up your axolotl tank, it’s important to place the hideouts in the right spots so your Axolotl can easily get inside and rest. They love to hide in dark areas because they tend to avoid bright lights, which can stress them out. I always make sure the space fits their body well and feels comfortable—something I learned from watching how often mine chooses the same spot. Axolotls will always pick a place where they feel safe, so planning where you place the hides really matters.
Tank Maintenance
Keeping your axolotl’s tank clean is very important for their health. To perform regular water changes, a siphon is required to remove debris from the bottom of the aquarium. I personally use a 5 Gallon Bucket which really helps during the process, especially when you do not use a Python or Hygger siphon. A Turkey Baster is also very useful and required to manually suck out poop and larger pieces of dirt between full cleans. These small steps keep the water fresh and your axolotl comfortable.
If you want to make things more easy and efficient, using a Python or Hygger siphon is a great option. These tools are optional but allow siphoning and refilling by attaching directly to the faucet, saving you time. Just remember, the entire tank volume must be dosed with conditioner immediately before refilling to make the water safe. I’ve used both methods, and while buckets work fine, these advanced tools simplify everything when cleaning gets tough.
FAQ
What do axolotls need in their tanks?
To help axolotls truly thrive, their tank must be specifically designed to support a healthy environment. It should be large enough for movement and hold a stable-temperature to reduce stress. I always maintain the proper water quality by checking temperature, pH, ammonia, and nitrite levels regularly. A good filter helps with this. A secure lid is also crucial because axolotls can climb and jump. For the substrate, I prefer sand over large gravel to avoid accidental swallowing. These basics are all required to give them what they truly need.
How to decorate an axolotl tank?
When decorating your axolotl’s habitat, it’s best to focus on providing safe, comfortable areas that allow natural movement and help prevent stress or harm. I like to create a space with natural-looking elements like driftwood, caves, and structures where axolotls can find hiding spots. Adding live plants or artificial ones can enhance the look while keeping things calm. For the bottom, fine sand or a bare bottom is recommended to avoid accidental ingestion of substrate. Airstones or bubble wands are also essential for aeration, helping to keep the oxygen levels stable in this suitable setup.
How to introduce an axolotl to a tank?
When you introduce an axolotl to a new tank, it’s important to acclimate it by floating the bag in the tank water and slowly adding small amounts of tank water over time. Wait until the water parameters like temperature and pH match, then gently release the axolotl into its new home. I always turn off the lights for at least 24 hours to minimize stress, and then begin slowly offering food once it settles.
What not to put in an axolotl tank?
For the health and well-being of your axolotl, always be cautious when placing anything inside the tank. You should avoid aggressive tank mates, and never use gravel, small rocks, or sharp rocks, as these can be swallowed and may cause serious issues like impaction. Decorations with small parts that could be ingested or pose a choking hazard are also unsafe. From personal experience, using only smooth, simple décor is best to prevent any hazards that might pose a threat.