
The axolotl, also known as the Mexican walking fish, is a fascinating yet sensitive aquatic amphibian — not a simple fish. Bringing an axolotl into your home can be exciting, but proper tank setup will determine whether your pet thrives or suffers from hidden mistakes that can harm its health.
Axolotls are neotenic salamanders that remain in their larval stage with soft gills, wide tails, and delicate limbs. Native to Lake Xochimilco in Mexico, these unique animals are now sadly endangered.
If you’ve brought one home or plan to, the first step is to create the right tank environment. After all, your axolotl can’t live in a bowl or a regular fish tank. In this guide, you’ll learn step-by-step how to set up a perfect home for your axolotl — so keep reading!
Axolotl Tank Setup (Quick Steps)
=For one adult axolotl, use at least a 20‑gallon long tank. A long, low tank is better than a tall one.
=Clean the tank, then fill it with tap water treated with a water conditioner, or use bottled spring water so there is no chlorine or chloramine.
=Keep the bottom bare or use fine, well‑rinsed sand. Never use gravel or small stones because axolotls can swallow them.
=Add a gentle sponge filter or another low‑flow filter so the water stays clean without strong currents.
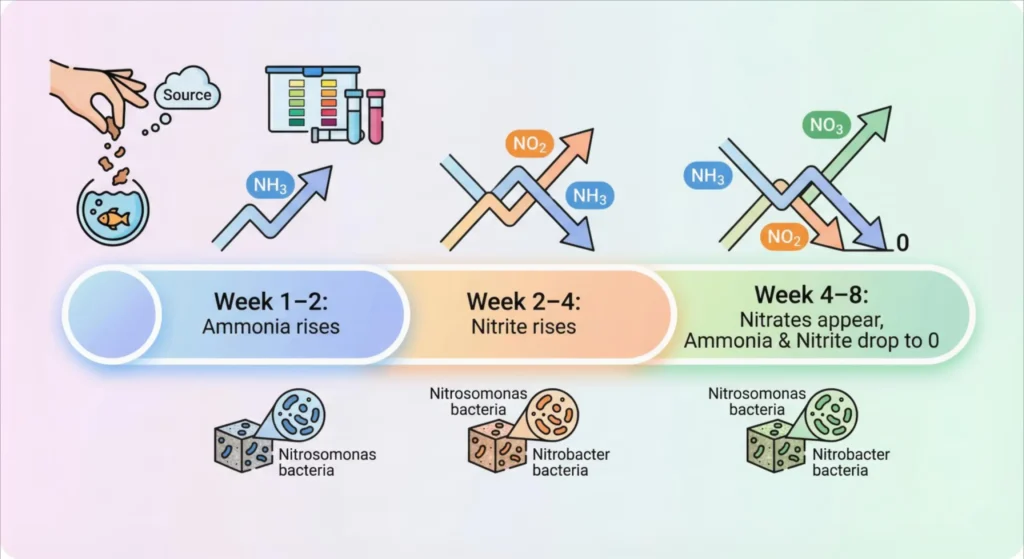
=Cycle the tank before adding your axolotl. Add a small ammonia source (like a pinch of fish food) and wait about 4–8 weeks until ammonia and nitrite are 0 and nitrates are stable.
=Keep the water temperature between 16–20°C (60–68°F). Do not use a heater. If it gets too warm, use a fan, room cooling, or a chiller.
=Use a test kit to check pH, ammonia, nitrite, and nitrate regularly. Do a 20–30% water change every week, and always treat new tap water with conditioner first.
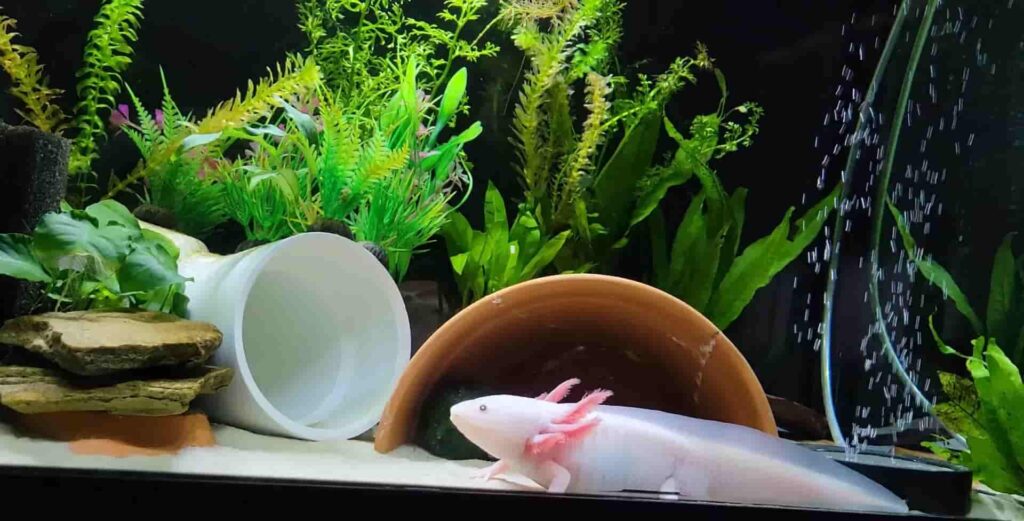
=Give each axolotl at least one or two smooth hiding spots, like PVC pipes or caves, so it can rest in the shade and feel safe.
=Use a soft LED light on low brightness and put it on a timer so your axolotl has a calm day–night routine.
=When you bring your axolotl home, float the bag in the tank for about 15 minutes, then slowly add tank water into the bag for another 15–20 minutes. Do not pour store water into the tank. Gently release the axolotl into its new home.
Why Axolotl Tank Setup Matters
Keeping an axolotl looks simple from the outside, but their comfort depends on more than a pretty tank. The real secret lies in two things — clean, cool water and the right kind of base at the bottom. These two details quietly decide how long your axolotl stays healthy and happy.
If the water gets too warm or the substrate isn’t safe, your pet starts feeling stressed. It may stop eating, lose energy, or fall sick without any clear signs. To visitors, the tank might look beautiful, but inside, the axolotl is struggling — and that’s the main reason a proper setup matters so much.
A well-balanced tank with steady, cold water and a simple soft or bare bottom creates a calm home where your axolotl can live 10–15 peaceful years. Watching it explore, rest, and eat confidently in that safe space gives a joy that no colorful decoration can replace — because real beauty is in your pet’s comfort.
Best Tank Size and Basic Equipment
Choosing the right tank size is one of the most important steps in keeping your axolotl happy. While a 10‑gallon tank can work for a tiny juvenile, an adult axolotl needs at least 20 gallons of space to live comfortably. In fact, the bigger the tank, the better.
A larger water volume keeps temperature and water chemistry more stable, protecting your pet from sudden changes that can cause stress or illness.
Always pick a long tank rather than a tall one. Axolotls are gentle bottom dwellers that prefer to walk and explore horizontally. A long, wide footprint gives them room to roam naturally, while a tall tank only wastes space they rarely use. You’ll notice this once your axie spends all its time moving along the floor, ignoring the empty upper water.
Many beginners think smaller tanks are easier to manage, but the truth is the opposite. Small tanks change temperature faster and build up waste more quickly. Bigger tanks dilute toxins and give you more time to fix small problems before your axolotl feels them.
A gentle filter—such as a sponge filter or low‑flow system—keeps the water clean without creating strong currents. Pair it with a thermometer to track temperature, and in warmer months, consider a small aquarium chiller, cooling fan, or water cooler to maintain safe levels.
Always use dechlorinated tap water, or bottled spring water during emergencies. Useful bacteria boosters like Tetra SafeStart or similar cycling aids can help, but nothing replaces regular maintenance and good tank size (they help, but are optional; cycling time still takes time).
To make your tank feel like home, add a few hiding spots such as smooth rocks, caves, or PVC tubes. A soft LED light and secure lid keep things visible and escape‑proof without causing glare.
Over time, you’ll learn your axolotl’s habits—where it likes to rest, when it comes out to explore, and how gently moving water keeps it calm.
With the right size, shape, and thoughtful layout, your axolotl’s tank becomes more than decoration. It turns into a steady, forgiving environment where your pet can live, rest, and explore in peace.
Cleaning a New Tank and Preparing the Water
A clean start for your axolotl’s tank begins long before your pet ever meets the water. This step is especially important if you’re reusing a secondhand aquarium, because hidden bacteria or residues from previous fish can linger inside the seals or corners.
Even a tank that’s just been stored, shipped, or traded between friends might harbor harmful microbes. For a soft‑skinned amphibian like the axolotl, these invisible threats can quickly cause illness.
If your setup is around 10 gallons, it’s often best to start from scratch (for axolotls, 10 gallons is only temporary for juveniles). Rinse the aquarium thoroughly to wash away dust and debris, then fill it with conditioned tap water or bottled spring water instead of guessing what’s left behind.
A simple method is to fill the tank with your measured water (for example, ten gallons), add around two teaspoons of AquaSafe or another trusted dechlorinator, and drop in a Tetra Start-Zyme tablet. Let the tank sit for a day or two so beneficial bacteria begin forming before your axie arrives.
Most modern tap water contains both chlorine and chloramine, which can silently harm delicate gills and disrupt early tank cycling if not treated. Using the proper dose of conditioner and allowing the aquarium time to stabilize ensures long‑term water health.
A water testing kit is essential during this stage. Over the first few weeks, you’ll notice ammonia and nitrite levels rise and then fall as good bacteria develop and balance the environment. This process transforms a simple glass box into a safe and living system.
When you take the time to clean, treat, and test carefully, your axolotl tank stops being a guess—and starts becoming a stable home where your new pet can grow strong without risk from invisible water problems.
Axolotl Water Temperature: Heating and Cooling Tips
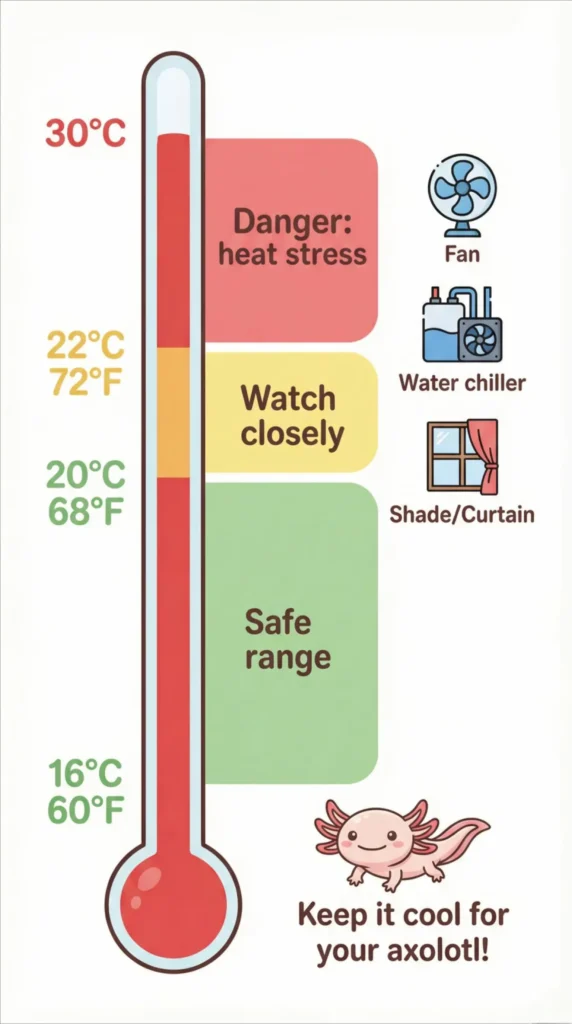
Axolotls are cold-water amphibians that thrive when their tank stays between 60–68°F (16–20°C). Within this range, they remain active yet calm, showing healthy energy without stress. When temperatures rise above 72°F (22°C) for extended periods, axolotls often show warning signs — restless pacing, floating at the surface, or refusing food.
Overheating also weakens their immune system, making them more prone to illness, so keeping a simple aquarium thermometer is one of the most valuable tools you can have.
Hot summer months are the real challenge. As room temperatures climb, the water warms up too. A clip-on fan that increases evaporation can gently lower the water temperature, and in hotter climates, an aquarium chiller or cooling unit can be a lifesaver.
Always remember that temperature changes must happen slowly. Never rely on guessing — measure the water regularly to make sure it stays stable.
Unlike tropical fish, axolotls do not need heaters. In fact, most aquarium heaters can harm them, since they are built for species that prefer warm water. The goal is smart cooling, not heating.
Controlling the room temperature, keeping the tank shaded, and combining passive and active cooling methods will maintain safe conditions more effectively than any heater.
Most axolotl problems come from heat, not cold. Treat every hot spell as a test and check your thermometer more often during summer. This simple habit — quietly watching the numbers and reacting early — prevents stress long before your axolotl shows visible signs of distress.
Caring for axolotls is really about steady awareness, not quick fixes, and keeping them cool ensures they live healthy, peaceful lives.
Filtration for Axolotls: Gentle Flow, Clean Water
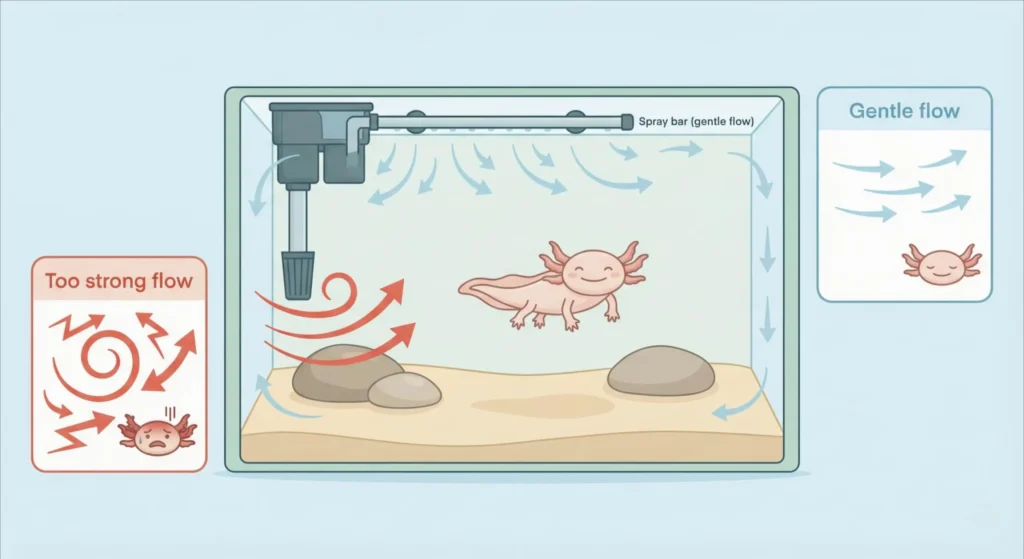
For axolotls, a low‑flow filter placed at the back of the tank is one of the quiet secrets to keeping them relaxed. The goal is to maintain crystal‑clear, healthy water—without strong currents.
These animals love stillness. When the flow is too powerful, they struggle to stay steady, which can make them anxious or tired.
It’s tempting to crank up a new filter to see the tank sparkle, but resist that urge. Strong currents may look nice under bright lights, yet they can stress your axolotl and even cause health issues.
In my experience, a sponge filter is a great beginner choice. It’s gentle, easy to maintain, and full of surface area for beneficial bacteria to grow. A carefully tuned canister filter also works well if you use a spray bar aimed at the glass to spread out the water flow, turning it into a soft current instead of a blast.
Think about where axolotls come from: calm, still Mexican lakes and canals—not rushing rivers. Your aquarium should mimic that peaceful environment with clean water and steady, gentle movement.
Good filtration combines biological, mechanical, and sometimes chemical media. When cleaning, always rinse debris gently to keep beneficial bacteria alive, since they’re what make the system stable.
Whether you choose a sponge or canister design, some form of flow control is essential. Observe how your axie reacts to the current. If it hides often or avoids certain areas, the flow may be too strong.
When it rests calmly and glides smoothly through even water, you’ll know the balance is right. The right filter doesn’t just clean the tank—it creates a stable, forgiving home that stays clear, healthy, and peaceful for years to come.
Safe Substrate for Axolotls (Bare Bottom vs Sand)
When planning the tank floor for your axolotl, always start with safety first. A bare-bottom aquarium is often the simplest and safest choice—easy to clean, clear to monitor, and completely free from the risks of impaction.
It might look plain at first, but it allows you to spot waste easily and protects your pet from swallowing anything harmful.
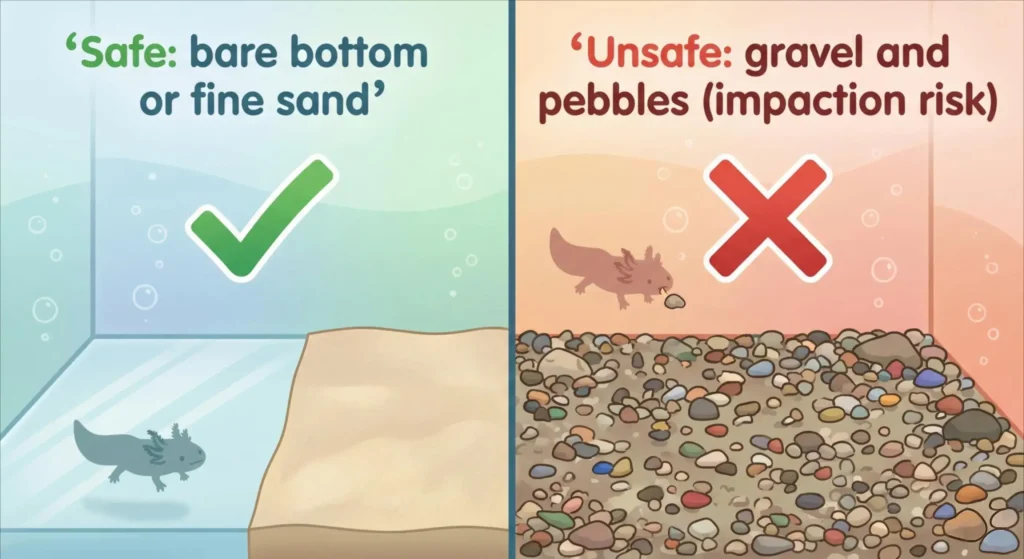
If you prefer a more natural look, fine aquarium sand is the next best option. Avoid gravel or small pebbles at all costs. Axolotls have a sudden, vacuum-style feeding habit, and they often gulp food with surprising force.
In that motion, small stones can easily get swallowed and block their digestive tract. These animals can take in objects nearly twice the size of their mouths, so substrate choice directly impacts their safety.
Before adding sand, always rinse it thoroughly until the water runs clear. This keeps your tank from becoming cloudy and prevents small, sticky particles from clumping. Clean sand also means that any bits your axie spits out will be harmless.
Through years of keeping axolotls, one thing has become clear: both bare-bottom setups and properly rinsed fine sand make tank maintenance simple and reduce health risks dramatically.
They also give the aquarium a calm, natural appearance without sacrificing safety. A clean, soft floor isn’t just about looks — it’s about creating a safe space where your axolotl can explore confidently and stay healthy for years.
Axolotl Water Parameters and Weekly Maintenance
Over time, one thing becomes very clear with axolotls: their health depends on quiet, stable water more than anything else. Regularly checking pH, ammonia, nitrite, and nitrate with a test kit turns guesswork into clear numbers, so you can see problems long before your axolotl does.
Using a good conditioner or dechlorinator on every bucket of tap water protects both your pet and the helpful bacteria in the filter that keep the tank fully cycled and balanced.
For day-to-day care, a simple routine works best. A weekly 20–30% water change is usually enough to keep nitrates in a safe range and stop waste from building up to dangerous levels.
Treat all new water before it enters the tank, and pour it in slowly so there are no sudden shocks in temperature or flow. These small habits add up, turning the aquarium into a calm, predictable environment where axolotls can live cleanly and comfortably for years.
Nitrogen Cycle and Fishless Tank Cycling Explained
For new axolotl keepers, understanding the nitrogen cycle is the key to making aquarium water truly safe, not just clear to the eye.

A proper cycle needs an ammonia source, such as a small pinch of fish food or pure ammonia, and a reliable test kit so you can watch the water change over about 4–8 weeks.
In this time, you first see ammonia rise, then nitrite increase, and finally nitrates appear.
The tank is only ready when both ammonia and nitrite are at 0 ppm and nitrates are stable, and skipping this step almost always causes hidden problems in a tank that looked fine at first.
Even if you always use a water conditioner or dechlorinator, a full cycle is still necessary because those products cannot replace the beneficial bacteria your filter needs.
Fishless cycling gives these bacteria time to grow before any axolotl is added, creating a balanced ecosystem that can handle daily waste without dangerous spikes.
Every time a new tank is set up, treating cycling as a patient, step‑by‑step process pays off: the numbers on your test kit stay steady, the water stays safe, and your axolotls enjoy calm, healthy conditions for the long term.
Safe Decor, Hides, and Plants for Axolotl Tanks

When choosing decor and hides for an axolotl tank, the first priority is always your axolotl’s comfort. Anything you add should match their size, give them space to turn around, and help block bright light, because axolotls feel safest in dim, shaded places. They are naturally shy, so having dark spots to retreat into makes them much calmer and reduces stress.
A simple rule that works well is one good hide for each axolotl in the tank. PVC pipes, smooth caves, and aquarium‑safe ornaments without sharp edges are all great options, as they won’t scratch or tear delicate skin.
Live plants and soft silk plants around these hides add enrichment and help create a more natural axolotl tank. Rooted live plants can also support water quality by absorbing some nitrates, especially in cooler water that axolotls prefer.
In my own axolotl setups, the best results come from mixing a few different hides and caves with a small number of safe decorative pieces and plants. I always check that every item is smooth to the touch so there is no risk of injury when the axolotl brushes against it.
Over time, careful choices in decor and layout help axolotls settle in more quickly, explore their tank with confidence, and stay healthier in the long run as part of good axolotl care and tank setup.
Lighting Setup for a Calm Axolotl Tank
From keeping axolotls, gentle lighting has always made a big difference in how relaxed they behave. Instead of bright, harsh light, a soft LED set to low brightness keeps them calm and helps prevent stress, since their sensitive skin and eyes react strongly to strong illumination.
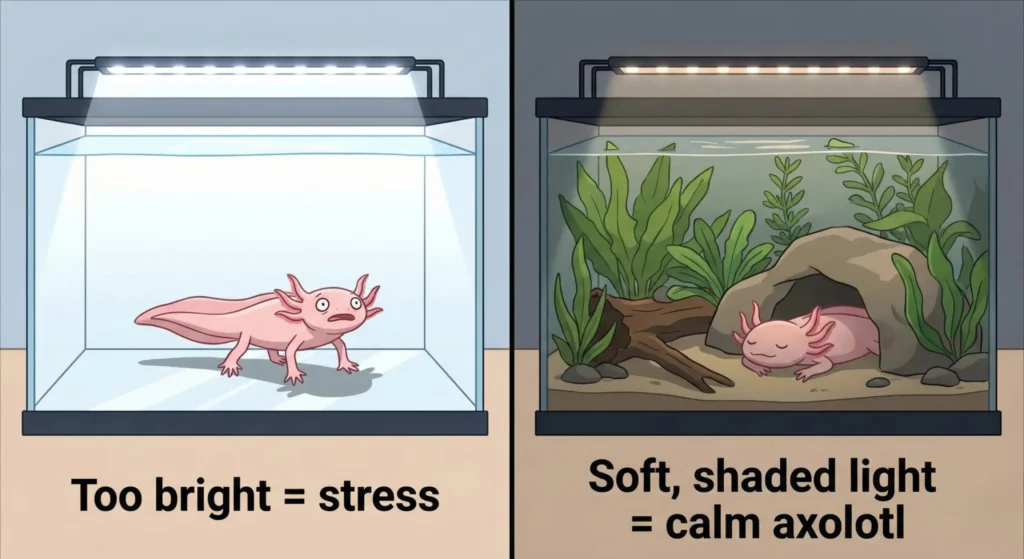
A dim, even light is usually enough to support a natural day–night cycle in the axolotl tank without making your pet feel exposed.
Using a simple plug‑in timer for the light also helps keep this routine consistent every day, so you don’t have to remember to switch it on and off by hand as part of your regular axolotl care and tank setup.
How to Acclimate a New Axolotl to the Tank
When bringing a new axolotl home, a slow, gentle introduction to the axolotl tank makes a big difference for its safety and comfort. After the trip, keep the axolotl in its bag from the store, or move it into a clean, hole‑free bag, fill it about halfway with tank or store water, and seal the top with a rubber band.

Place this bag carefully in the tank and let it float for around 15 minutes so the water inside slowly matches the tank temperature.
Next, open the bag and add a small amount of tank water every few minutes for another 15–20 minutes. This gradual mixing helps your axolotl adjust to the new water parameters without sudden changes.
Keep the tank lights off during this time so the axolotl feels less exposed and stressed. Once acclimation is complete, you can gently release the axolotl into the tank, avoiding sudden movements or splashing.
This simple floating and slow‑mixing method prevents temperature shock and reduces the risk of stress from rapid chemistry changes. By taking a little extra time on this “first day,” you give your new axolotl a calm, safe start in its new home, which supports better health and smoother adjustment in the days that follow.
Feeding Your Axolotl: Simple Daily Care
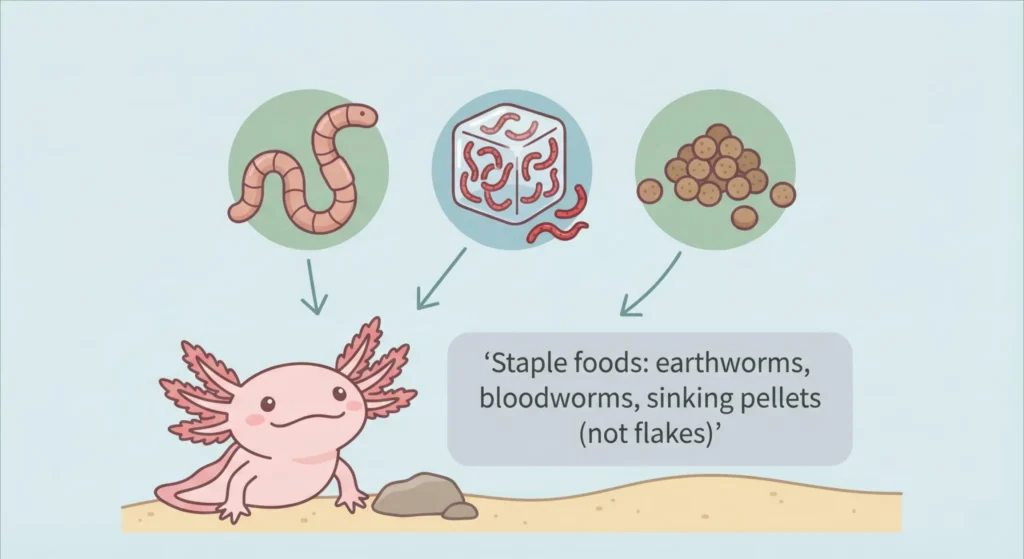
From looking after axolotls over the years, feeding has always worked best when the diet is simple and steady. A mix of earthworms, bloodworms, and good‑quality sinking pellets gives them the protein and nutrition they need, while food that sinks makes it easier for them to find and eat calmly at the bottom of the axolotl tank.
Keeping a regular feeding schedule also helps with axolotl care, because you can quickly remove any uneaten food to protect water quality and watch their appetite, behavior, and growth at the same time.
Whenever someone new asks about axolotl care, I always explain that the right food does more than support a healthy body. Gentle, consistent feeding lets you learn each axolotl’s habits, from how quickly it eats to where it likes to wait for food, and over time that routine creates a quiet bond between you and your pet while keeping the tank setup clean and stable.
Axolotl Tank Maintenance and Troubleshooting
In my own axolotl care routine, tank maintenance stays simple but consistent. A weekly water change, gentle siphon of the substrate or bare bottom, and light filter cleaning are usually enough to keep the axolotl tank stable and the water clear. Using a reliable test kit alongside this routine helps me notice any changes in water parameters before they turn into real problems.
When something does go wrong, I start by checking for common issues like cloudy water, leftover food, unusual waste, or small signs of axolotl stress such as loss of appetite or restless behavior.
Catching these early almost always means an easy fix, like an extra water change or adjusting filtration or feeding. This steady, calm approach to maintenance and troubleshooting has kept my axolotls comfortable, healthy, and settled in their tank setup over the long term.
Pro Tips and Final Axolotl Tank Checklist
For new axolotl keepers, the biggest “pro tip” is simple: do not rush your tank setup. Letting the axolotl tank fully cycle before adding your pet is the most important step, because an uncycled system might keep an axolotl alive for a while but rarely lets it truly thrive.
A stable, mature tank with working filtration and steady water parameters gives your axolotl a much safer start and prevents many early health problems.
When building my first axolotl tank, using a clear checklist and simple visual guides helped a lot. Step‑by‑step photos, diagrams, and advice from experienced keepers made it easier to choose safe equipment, plan hides and substrate, and create a tank setup that looked good and felt comfortable for the animal.
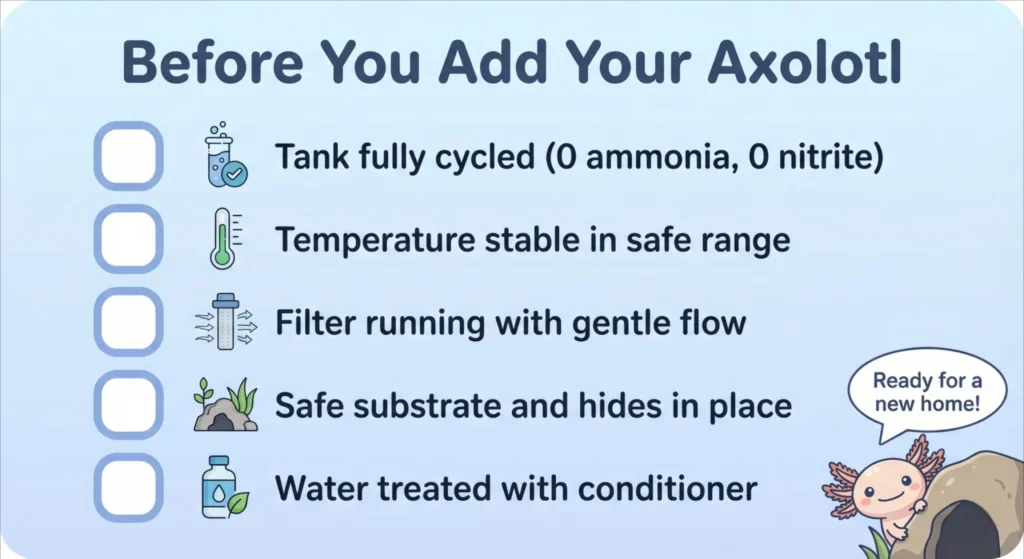
Having a printed checklist to tick off—cycle complete, water parameters good, filtration running, hides in place—turned preparation into a calm, organized process and made welcoming a new axolotl feel exciting instead of stressful.
FAQ
What do axolotls need in their tanks?
Axolotls need a cool, stable tank with enough space, gentle filtration, and safe substrate. A long 20‑gallon tank or larger, a soft‑flow filter, bare bottom or fine sand, and a secure lid cover the basics. Regular testing of temperature, pH, ammonia, nitrite, and nitrate keeps the water safe and helps them stay healthy.
How to decorate an axolotl tank?
Decorate with safety first: smooth caves, PVC pipes, and driftwood that create shady hiding spots. Add live or soft fake plants to make the tank look natural without stressing your axolotl. Avoid sharp edges and use bare bottom or fine sand so nothing dangerous is eaten by mistake.
How to introduce an axolotl to a tank?
Float the sealed bag in the tank for about 15 minutes so the temperature matches. Then slowly add small amounts of tank water into the bag for another 15–20 minutes. When it has adjusted, gently release the axolotl into the tank without pouring store water in, and keep the lights dim while it settles.
What not to put in an axolotl tank?
Do not use gravel, small stones, or sharp rocks, because they can be swallowed or cause injury. Avoid decorations with tiny loose parts and stay away from aggressive or fast tank mates. Strong currents from powerful pumps or airstones should also be avoided, as axolotls prefer calm, still water.