
If you’re someone who cares about your axolotl diet, you probably already know that earthworms are a nutritionally complete and staple diet for these little guys. But having to purchase fresh worm containers every few days can get expensive and super time consuming.
As an axolotl owner myself, I found that keeping a small worm bin at home is actually a really effective way to have a consistent supply of food for my pet. It saves me from having to keep buying containers from bait shops all the time and lets axolotl owners like me order less often.
This article will also detail how to create a worm bin from scratch, and I’ll even throw in some personal Axolotl tank decor ideas to make the whole setup look cool while staying functional.
How to Make a Worm Farm at Home (Step-by-Step)
If you’re tired of buying worms all the time for your axolotl, making a worm farm at home is a simple and cheap solution. All you need is a plastic bin, some basic supplies like cardboard, newspaper, and bio-substrate (like peat moss, soil, or manure), and you’re ready to go. Drill air holes, add bedding, mix in food scraps, and toss in red wigglers. Keep the bin in a cool, dry place, feed the worms only safe vegan scraps, and stir the soil weekly to prevent bad smells or bacteria. You can even gut-load the worms with leafy greens or eggshells to make them more nutritious for your axolotl.
Let’s discuss this step in detail so you can understand it clearly.
Bringing Everything Together

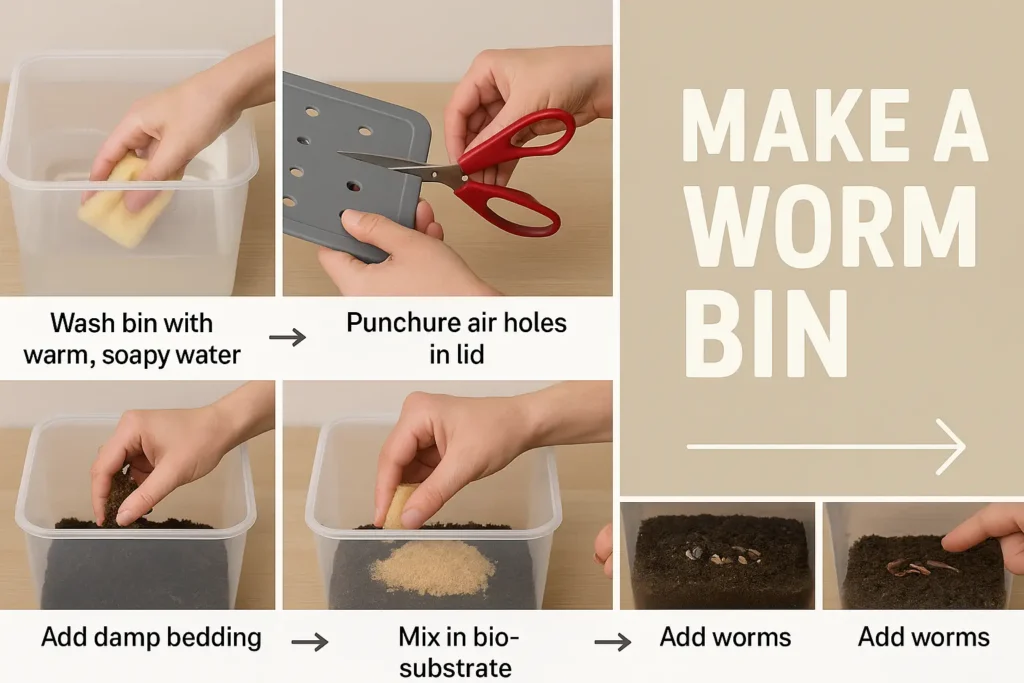
Once you’ve prepared all the supplies, it’s time to start assembling your worm bin step by step. Start by cleaning the bin with warm, soapy water, and make sure you rinse it really well afterward. Next, gently make air holes in the lid using something sharp like scissors or a box cutter.
If the holes turn out too large, you can cover them with mesh and use super glue to hold it in place for better protection. After that, spread out the damp bedding, especially if it was collected outside—make sure it’s properly sterilized.
Then, mix in the bio-substrate so it’s mostly covered. Add 1 cup of food and spread it gently, adding more if needed, to help keep pest insects away.
Now it’s time to add the worms—they’ll naturally burrow into the bedding, so there’s no need to cover them up. Finally, put the lid back on, and your worm bin is ready to use. If you’re feeding the worms to your axolotl, simply dig one out with your chosen tool, rinse off the dirt using plain water (no soap), and get it according to your pet’s preference.
Some axolotls prefer blanched red wigglers since they dislike the bitter slime these worms release when stressed—a lesson I personally learned through trial and error while feeding mine.
Helpful Worm Farming Tips
When choosing worms, I recommend red wigglers, also known as redworms, wigglers, bait worms, compost worms, or even Indian Blues. Just for reference, 1 pound is roughly equal to 1,000 red wigglers or about 400 nightcrawlers.
To keep your worm bin in good shape, gently stir the soil once a week to prevent anaerobic bacteria from collecting at the bottom, which can lead to bad smells. To keep pests away, try burying the worm food under the bedding and lay a piece of cardboard over the soil surface.
You should only add more food once the previous food is gone or the bedding becomes dry. Also, always keep your bin in a cool, dry place, ideally between 15°–26°C (60°–80°F)—an aquarium stand works great if the garage is unavailable.
To boost the nutrition of your earthworms for feeding pets like an axolotl, try gut-loading them with leafy greens, eggshells (with the membrane removed), or calcium powders—this improves their positive calcium phosphate ratio and helps prevent calcium deficiency.
One trick I use is to freeze grocery scraps into a block—then just toss the frozen scraps in the bin when needed; there’s no need to thaw. This also helps reduce waste and prevents overfeed issues. Lastly, using paper or cardboard shredders makes bedding production much easier and faster.
Supplies
When I started my own worm farm, I was surprised by how many supplies I already had around my home. You don’t need anything fancy—just a few basics to get started. A plastic storage tote with a lid (at least 12 qt) works perfectly as the worm bin.
I found mine at a home improvement store, but you can also check Amazon for links that offer more convenience if you prefer shopping online. For bedding, I used shredded newspaper and cardboard, which I had lying around, and it worked just fine.
What I really liked about this setup was the chance to practice repurposing and reduce waste. Using old plastic bins and newspapers not only saves money but also helps protect the environment.
It keeps more trash out of landfills, which matters a lot for endangered species living in nearby habitats. To complete your setup, add bioactive substrate like fertilizer-free top soil, coconut coir, or peat.
For food, toss in some vegan food scraps, and of course, the stars of the show—worms like red wigglers or nightcrawlers.
The Container
When I first started my worm farm, I picked a plastic bin that was at least 12 quarts or even larger to house my worms comfortably. The size matters because it gives space for an adequate microbial biome to develop properly.
I had to carefully drill and puncture several rows of ⅛ inch holes into the lid of the container to help with air circulation. You can optionally use window screening or mesh material for the lid, which can improve airflow even more.
The level of light hitting the bin affects whether the worms stay buried or attempt to crawl out. That’s why it’s important to use an opaque container, with only a small amount of light reaching the top — just enough to keep them from escaping without causing them stress.
Bedding
Picking the right bedding is essential for keeping your worm bin healthy. You can use a variety of materials such as shredded newspaper, cardboard, straw, or herbivore manure. This bedding not only provides shelter for the worms but also supports their digestion by helping break down food mechanically.
I always make sure the shredded material is soaked in dechlorinated water, then squeezed until the extra water is removed. It should feel moist, not dripping wet. No matter the size of your bin, try to keep approximately 15 cm (that’s 6″) of bedding in the bin to keep the worms comfortable and thriving.
Boosting the Bin with Natural Bedding
When setting up your worm bin, one important component you shouldn’t ignore is the bio-substrate. This special substrate helps worms by supporting their bacterial digestion, which means it assists them in breaking down food scraps faster.
A good rule I follow is: if it’s alive or has been alive, it likely has a microbial system that worms will absolutely love. Things like leaf litter, fertilizer-free soil, coconut coir, peat moss, and even manure from herbivorous animals work great as biological substrates.
What’s cool is that manure actually doubles as both bedding and a substrate! Just make sure to mix these in a 1:1 ratio, and always sterilize anything collected outdoors by boiling—trust me, that works best to keep the farm safe. (And while I started with worms, I later used some of these same substrate ideas when learning how to breed axolotls—nature really overlaps in fun ways!)
Worm Feeding Tips
When I first started my worm farm, I quickly learned that worms should only be fed certain types of food scraps—but never animal products, except eggshells (as long as the membrane is removed).
Avoid adding citrus, spicy foods, or anything from the allum family like garlic and onions, because these upset the balance of the bin. If you overfeed, it can trigger a nitrogen spike in the soil, which acidifies it and makes the worms try to escape—or worse, they might die.
It reminded me of when I was figuring out What Food is Best For Your Axolotl?, because just like axolotls, worms also need a careful diet to stay healthy.
FAQs
How to prepare earthworms for axolotls?
When I first started feeding worms to my axolotl, I realized how simple it actually is. I just dig one out using a small tool, give it a good rinse with water (no soap ever!), and gently wash the dirt off. You can prepare it according to your axolotl’s preference—some like smaller bits, others enjoy the whole worm. Just keep it clean and feed what’s desired, and you’re all set. It’s that simple.
What kind of worms are best for axolotls?
Many axolotls, including my own named Moscato, prefer certain types of worm over others. Nightcrawlers, or earthworms, are often seen as the ideal food for adult axolotls, but not every axolotl likes them. A whole worm can be too large for some, so I typically slice them into halves or thirds. It might look harsh, but worms don’t experience pain like humans do. Interestingly, my axolotl Moscato refuses to eat earthworms, so I had to explore other feeding choices.
How many worms should I give my axolotl?
When it comes to feeding axolotls, I’ve found that pet parents should let them eat as much as they can in about three to five minutes. No matter how old your axolotl is, the food you offer should always be smaller than the width of its head. This helps avoid choking and makes sure your little buddy gets the right amount without overfeeding.
Can I feed earthworms to my axolotl?
Yes, you can absolutely feed earthworms to your axolotls—in fact, they require them as a staple part of their diet. Earthworms give proper nutrition, and they help support healthy growth. Just remember, if the worm is too large, it should be cut at least in half in order to match the size of your pet. Axolotls need food that fits in their mouth, especially if the axolotl is small, so size really matters as you prepare.